Bathroom Flooring Installation Checklist: Prep, Waterproofing, and Gaps
Follow this checklist for bathroom flooring installation, including subfloor prep, waterproofing steps, and proper expansion gaps for DIY success.
Nail Your Bathroom Floor From Day One
Bathroom flooring installation can look great on day one and still fail a few months later. Buckling boards, cracked grout, or that musty smell of hidden mold often come from one thing: the prep work was rushed or skipped.
We want to help you avoid that. This checklist walks through the big pieces that make a bathroom floor last: subfloor preparation, smart waterproofing, and the right expansion gaps for the flooring you choose. We will touch on tile, vinyl, laminate, and engineered wood, and point out where a professional installer makes a big difference.
Summer is a popular time for bathroom remodels in Sugar Land. Many families are home more, kids are in and out of the bathroom, and the heat and humidity are no joke. Those conditions make good installation habits even more important if you want a floor that stays beautiful and solid year after year.
Know Your Bathroom Subfloor Before You Start
Your new floor is only as good as the surface under it. Bathrooms usually see more water, more traffic, and more movement than other rooms, so the subfloor has to be strong and stable.
Most homes have one of these under the bathroom:
- Plywood, common in many homes, can work well if it is dry and solid
- Oriented strand board (OSB), similar to plywood but handles moisture differently
- Concrete slab, very common in our area, but still needs testing and prep
Before any tile, vinyl, or planks go down, a pro will carefully check the base. A solid checklist for subfloor prep includes:
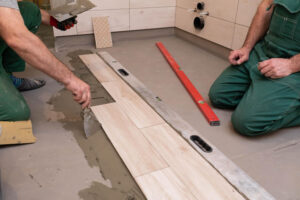
- Check for level with a long level or straightedge
- Press around toilets, tubs, and showers to find soft or bouncy spots
- Listen for squeaks and tighten fasteners where needed
- Replace or repair any rotted, crumbly, or swollen sections
Many bathroom floors also need underlayment or cement backer board. This is especially true under tile and some vinyl systems. The thickness of these layers affects how your bathroom floor meets the hall or bedroom outside, so planning transitions early matters. Older Sugar Land homes can have patchwork repairs or thin subfloors, while newer builds might have flatter slabs but still need some smoothing. Either way, skipping a full inspection usually shows up later as cracks or loose tiles.
Moisture, Waterproofing, and Mold Prevention Basics
There is a big difference between water-resistant flooring and a truly waterproof installation. Water-resistant means the top surface can handle some splashes. Waterproof installation means the whole system is built to keep water from getting where it should not go.
That is especially important in bathrooms with kids, walk-in showers, or anyone who wants low-maintenance floors. A careful installer will:
- Test concrete slabs for moisture before adding flooring
- Seal seams, corners, and fastener holes in underlayment or backer board
- Use the right membranes or waterproof underlayments around tubs and showers
Critical spots need extra attention. Around the toilet flange, tub edges, and plumbing pipes, the goal is to block water pathways. Pros often use things like:
- Caulk at changes in plane or small gaps
- Foam backer rod in wider joints before caulking
- Waterproof tapes or bands where materials meet
Local humidity means trapped moisture can feed mold under your new floor if the space cannot dry. Good ventilation and a working exhaust fan help the room breathe. Proper curing time for adhesives, patching compounds, and grout is also key, even if everyone is eager to start using the new bathroom again.
Expansion Gaps That Protect Your New Floor
Many modern floors float instead of being glued or nailed to the subfloor. Laminate, click-lock vinyl, and some engineered wood systems are designed to move a little as temperature and humidity change. If there is no room to move, the floor can buckle or peak.
For floating floors, a simple checklist helps keep that from happening:
- Leave the correct expansion gap around all walls, tubs, and cabinets
- Use spacers to keep gaps consistent during installation
- Cover the gap later with baseboards, quarter-round, or matching trim
- Use transition strips where the bathroom meets another type of flooring
Tile behaves differently, but it can still crack if it has no space to handle movement. Long runs, changes in plane, or spots with strong sunlight from a window may need flexible movement joints. In those places, a skilled installer will use caulk or other flexible materials instead of rigid grout.
Summer installs in Texas bring another layer of care. Acclimating flooring inside your home before installation and keeping the indoor climate steady during and after the work helps limit peaking, gaps, and cracked grout. Flooring that goes in when the room is very humid, then dries out fast, can move more than you might expect.
Smart DIY vs. Pro Help for Bathroom Flooring Installation
Some people like to tackle home projects on their own, and simple bathroom layouts can make that tempting. Still, bathrooms are not the best place to learn by trial and error. The mix of water, tight spaces, and tricky cuts can turn a small mistake into a long-term problem.
It helps to be honest about your comfort level. Many handy people find that these situations are better left to pros:
- Major subfloor repairs or replacing damaged sections
- Curbless or low-profile showers with drains in the floor
- Large-format tile that shows every small hump or dip
- Glue-down or complex patterned floors that need tight layout control
- Adding heated floors under tile
Planning is also bigger than just picking a color. A strong installation plan covers:
- Measuring carefully and allowing for a waste factor in every material
- Deciding how the layout will look at the doorway and around floor drains
- Having the right saws, trowels, spacers, and safety gear on hand before demo
Professional installers work with uneven slabs, wavy walls, and real-world surprises every day. They know how to prepare surfaces for different flooring types, follow manufacturer guidelines, and protect the warranties that often come with modern products. Our team at Sam’s Flooring Gallery helps people in Sugar Land with product advice, planning, and full bathroom flooring installation so the finished room looks right and performs well.
Turn Your Checklist Into a Bathroom Floor You Love
A little planning before the first tile or plank goes down can save a lot of stress. We suggest keeping this checklist handy and walking through your bathroom step by step before you choose materials or start tearing out the old floor. Look closely at the subfloor, think through waterproofing around every water source, and make a plan for expansion gaps that match your flooring type.
From there, it helps to break the project into smaller stages. You might use one weekend to assess the existing floor and any needed subfloor repair, another few days to lock in waterproofing and material choices, then set aside installation time when your home schedule is calmer and indoor conditions are steady. With careful prep, smart moisture control, and properly planned movement space, you can enjoy a bathroom floor that looks great, feels solid, and stands up to Texas heat, humidity, and everyday life.
Get Started With Your Project Today
Transform your bathroom with flooring that looks great and stands up to everyday use. Explore our bathroom flooring installation options and let our team at Sam’s Flooring Gallery guide you from selection through completion. If you are ready to discuss your project or schedule a visit to our showroom, simply contact us today.